As I’ve mentioned before, I believe The Elm Architecture (TEA) is a particularly good fit to implement projectional editors for the web.
So I’ve used the Elm programming language, which has TEA built-in, to create a little prototype I wanted to demonstrate.
The main goal of this was to find a setup which is easy to use even for people not familiar with Elm, to allow them to try it out. It’s by no means complete or stable, so don’t expect wonders.
What’s there?
There exist three Elm modules (a module is a compilation unit in Elm) that guide you along building projectional editors. The repository can be found here.
- Runtime: Allows you to set up a “Elm projection program”
- Structure: Contains the central type (“Node”) to built Elm projections, as well as functions to build models.
- Editor: Contains an API to transform domain models into cell models, which get eventually rendered in HTML; it also encapsulates common behavior from your domain, like
- adding/deleting domain nodes and properties (especially updating nested structures, which requires a lot of boilerplate in Elm)
- automatically updating selections (still pretty incomplete and buggy)
What’s bad?
A lot of things, believe me, but one thing I wanted to mention explicitly is that, by using the common type “Node” as the main building block for everything looses a lot of the nice type-safety in Elm.
Also, the code’s bad, so don’t look at it if can avoid it ![]()
Naturally, everything is subject to change, so don’t rely on anything that’s there.
Example
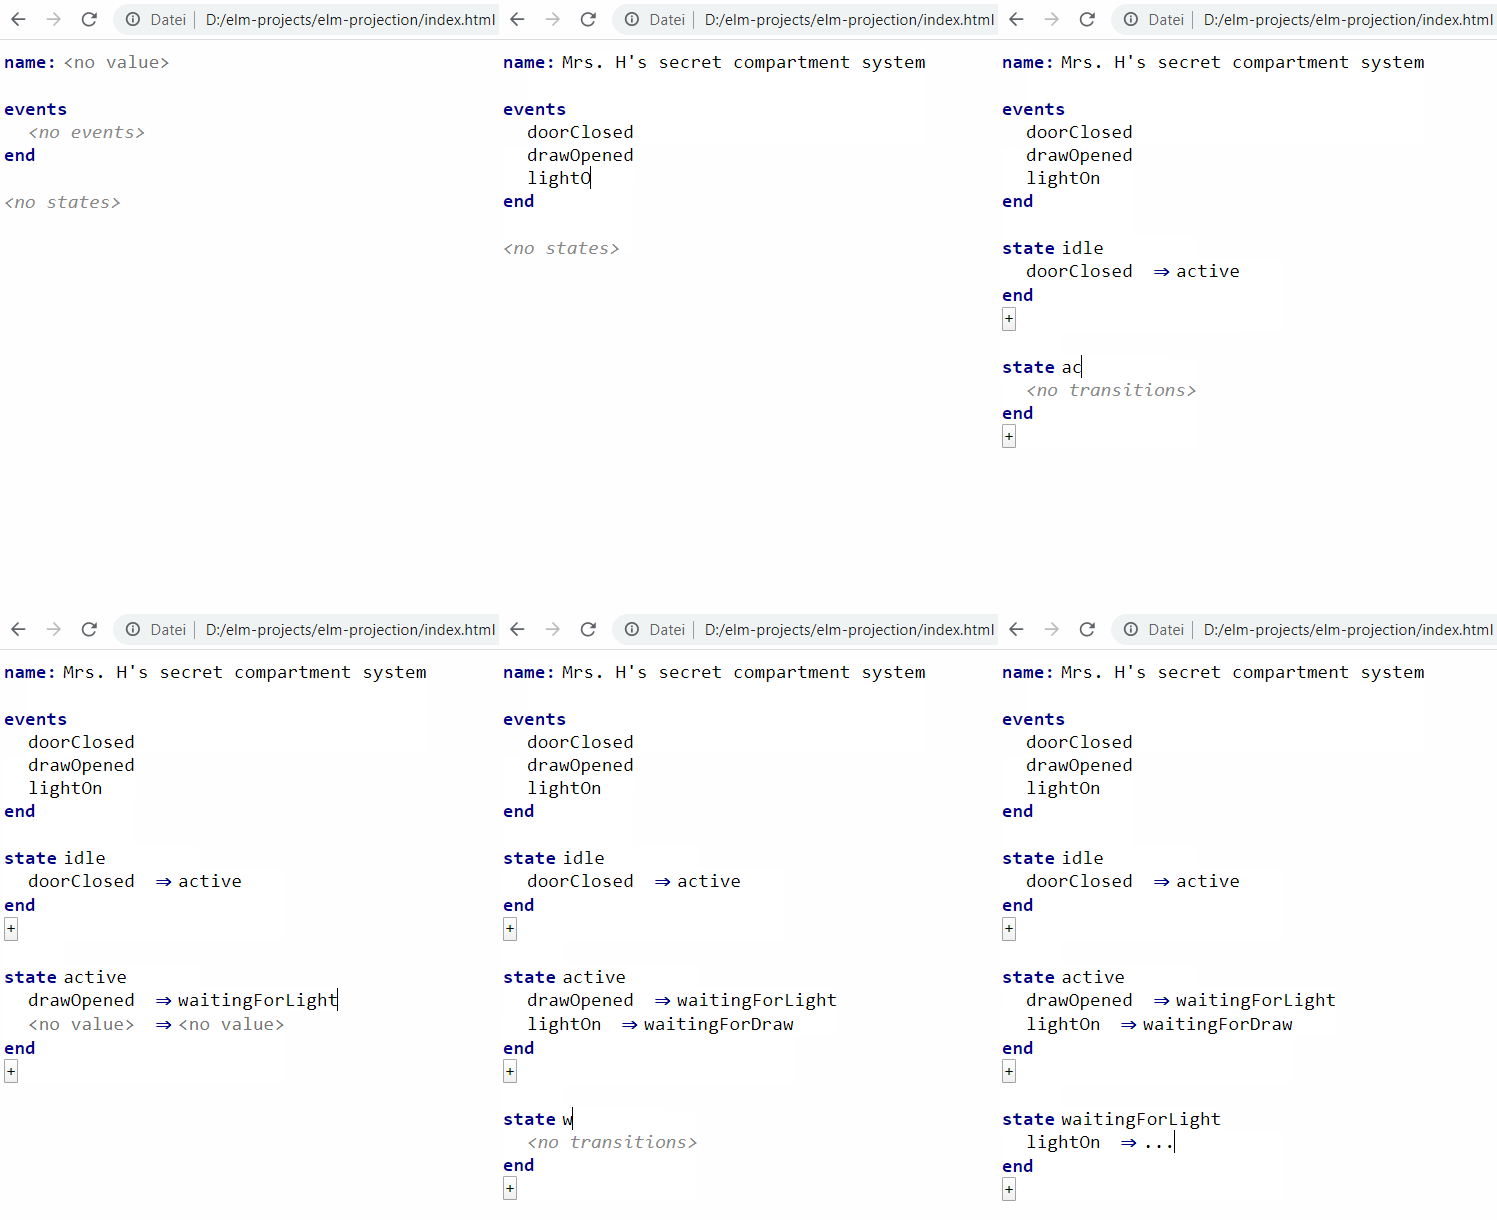
Let’s look how one can build an editor for a (very basic) state machine language like this:

There is no code generation, scoping, type checking, or anything like that. It’s just a model and it’s projection in Html.
The Elm code to build a web editor like that is currently best divided into four part, three of which are very simple. So we will look at the source code step-by-step, starting with a necessity:
Necessity - imports
import Structure exposing (..)
import Editor exposing (..)
import Runtime exposing (Model, projection)
Elm requires you to import modules you want to use. This can be done as shown above. The little (..) after the exposing keyword means we are lazy and make everything that is exposed by a module available in our module. We can (and actually always should) list everything we use from a module, like shown for the import of Runtime, where all we use is the Model type and projection function.
Step 1 - Domain variants
Elm features custom types similar to union types. In order build domain trees, we need to define a “domain type” which lists all type variants of our domain:
type Domain
    = StateMachine
    | Event
    | State
    | Transition
The type is called Domain and there are four “entities” or “concepts” in our language: StateMachine, Event, State, and Transition. I might use the term “variant” to refer to those sometimes.
Notice that we don’t make any assumption on how these are connected. The structure will be built rather implicitly in Step 4.
Step 2 - Program setup
main =
    projection initStateMachine editor
We use the projection function of the Runtime module to set up our Elm program. It expects two arguments:
- an initial version of our domain model: that’s
initStateMachine - a transformation function that takes in our domain model and produces a so-called “cell model”: called
editorhere
Notice that I deliberatly omitted the explicit type signature of the main function, since I believe that it would reather confuse you than help you. In general, it is a good practice to add explicit type signatures to top-level values and functions, even though Elm does not need them since it figures out all types by itslef.
Step 3 - Initial Domain Model
initStateMachine : Node Domain
initStateMachine =
    createRoot StateMachine
We define the value initStateMachine as a root node of variant StateMachine. Naturally, in the future we want to be able to save our models and load them again, but this is out of scope for this prototype.
Step 4 - Domain Model to Cell Model transformation, aka “Editor”
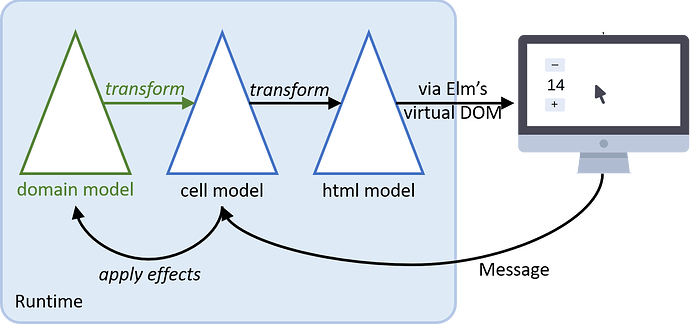
The current architecture looks like this:
While the blue and black stuff is taken care of, we are in charge of adding the green, which includes the transformation from domain model to cell model, i.e. a description of the editor.
I tried to create a very declarative API to do that.
editor : Node Domain -> Node (Cell Domain)
editor stateMachine =
    createRootCell
        |> with (editorStateMachine stateMachine)
This is our main transformation function we pass on to the projection function in Step 2. Notice the type signature at the very top: it takes a Node Domain and produces a Node (Cell Domain). If you are familiar with generic types in other languages, you can see that as argument of type Node<Domain> and a return type of Node<Cell<Domain>>.
The fact that the Cell type currently is tagged with our Domain type is an implementation detail I plan to get rid of, so that this should become editor : Node Domain -> Node Cell at some point.
Anyway, we create a root cell and use Elm’s pipe operator (|>) to pass on the root cell to the Editor.with function. It means that whatever is produced by the first argument, e.g. the function call editorStateMachine stateMachine gets added to our root. Let’s look at that function next.
editorStateMachine : Node Domain -> Node (Cell Domain)
editorStateMachine sm =
    vertStackCell
        |> with (editorStateMachineName sm)
        |> with (editorEvents sm)
        |> with (editorStates sm)
The editorStateMachine function creates a “vertical stack cell”, which is enhanced by three “sub-editors”, which we will tackle one-by-one:
editorStateMachineName : Node Domain -> Node (Cell Domain)
editorStateMachineName sm =
    horizStackCell
        |> with (constantCell "name:")
        |> with (inputCell "name" sm)
        |> addMargin Bottom 20
This represents “the first line” of our editor, hence a horizontal stack cell as a container. It contains a constant of value “name:” and a input cell for a property called “name” on the state machine node. We also add 20 pixels margin below this sub-editor.
editorEvents : Node Domain -> Node (Cell Domain)
editorEvents sm =
    let
        editorEventsResult =
            case getUnderCustom "events" sm of
                [] ->
                    [ editorEventPlaceholder sm ]

                events ->
                    List.map editorEvent events
    in
        vertStackCell
            |> with (constantCell "events")
            |> with
                (vertStackCell
                    |> addIndent
                    |> withRange editorEventsResult
                )
            |> with (constantCell "end")
            |> addMargin Bottom 20
This is a bit more involved and I have ideas to simplify it.
Let’s focus on the bottom part first. We want to describe a vertical stack of cells that starts with the events keyword and ends with the end keyword.
...
vertStackCell
	|> with (constantCell "events")
	...
	|> with (constantCell "end")
...
In between, we want to see all Events of our domain, or show a placeholder cell that allows us to add a first event. We wrap either result in its own vertical stack, so we can have it easily indented. withRange allows us to add lists of editors:
...
(vertStackCell
	|> addIndent
	|> withRange editorEventsResult
)
...
We define a local value called editorEventsResult which makes the decision what to show.
First, It looks for events under the state machine node.
getUnderCustom "events" sm
Notice that this means we expect our events to live under a custom “feature” called "events". Each Node can have children either under a default feature, or a labeled, custom feature, like the one we are using here. The rationale is that states are the “main thing” of a state machine and should therefore live under its “default” feature (we will see this below), whereas everything else should be grouped under custom features, like events should live together, under the "events" feature.
If the lookup of children under “events” is empty (denoted by the first case match using a Empty List Literal: [] ), we produce a placeholder cell.
If there are events, we map them over the editorEvent function to produce a list of editors (i.e. a list of type Node (Cell Domain)).
Before we look at the placeholder editor for events, let’s look at the editor for states, since it is very similar to the one for events.
editorStates : Node Domain -> Node (Cell Domain)
editorStates sm =
    let
        editorStatesResult =
            case getUnderDefault sm of
                [] ->
                    [ editorStatesPlaceholder sm ]

                states ->
                    List.map editorState states
    in
        vertStackCell
            |> withRange editorStatesResult
Again, we decide whether to show a placeholder or the list of states by means of a local value (editorStatesResult). However, this time, we look under the state machine’s default feature for state children, this was our design decision for our state machine models.
Now, let’s see the placeholder editors. They introduce explicit effects:
editorEventPlaceholder : Node Domain -> Node (Cell Domain)
editorEventPlaceholder sm =
    placeholderCell "no events"
        |> withEffect (replacementEffect "events" sm ctorEvent)


ctorEvent : Node Domain
ctorEvent =
    createNode Event
        |> addText "name" ""


editorStatesPlaceholder : Node Domain -> Node (Cell Domain)
editorStatesPlaceholder sm =
    placeholderCell "no states"
        |> withEffect (replacementEffect "" sm ctorState)


ctorState : Node Domain
ctorState =
    createNode State
        |> addText "name" ""
The Editor.placeholderCell function allows us to produce a placeholder cell with a default text.
We explicitly have to add a certain “effect” here to make it work, using the Editor.withEffect function. This way, we tell the system what to do when the user presses “Enter” whilst the placeholder cell is focussed. Currently, the effect will add a “first” child under the given feature to the given node.
In case of the event placeholder, we want to add an event node under the "events" feature of the state machine node sm.
The function ctorEvent descibes how a new event looks like.
Notice that this function uses the Structure API to build a domain node, whilst our editor functions use the Editor API to build cell nodes!
The editorState function uses the same patterns as we’ve seen above, but it introduces the usage of a new cell kind (buttonCell) and a new effect kind (insertionEffect). Feel free to check it out.
And let me know what you think!


